You keep your bladder accumulator working well by checking it often. You should always follow safe steps. Use clean hydraulic fluid. Do the right pre-charge maintenance. Stop leaks to avoid problems. Chaori Hydraulic bladder accumulators are easy to take care of. You can change the bladder without trouble. Always use nitrogen for pre-charging. Never use air or oxygen. Many people make mistakes when doing maintenance. The table below shows common mistakes and why they happen:
| Mistake Description | Reason |
|---|---|
| Incorrect pressure charging | If the pressure is too high or too low, the bladder can break. |
| Bladder bursts during installation | Charging too fast can make the bladder expand unevenly and burst. |
| Twisting the bladder during installation | Twisting can block parts and cause cuts from the poppet valve edge. |
Key Takeaways
- Check your bladder accumulator often for leaks, rust, or damage. Finding problems early stops bigger issues.
- Use only dry nitrogen when you pre-charge. Do not use air or oxygen. This keeps things safe and stops damage.
- Make sure the hydraulic fluid is clean by filtering it to 10 microns or less. Clean fluid keeps the accumulator safe and helps it last longer.
- Change the bladder if you see wear or after a few years. This helps your system work well.
- Write down all maintenance work. Good records help you find problems early and make maintenance better.
Routine Bladder Accumulator Maintenance
Visual Inspection
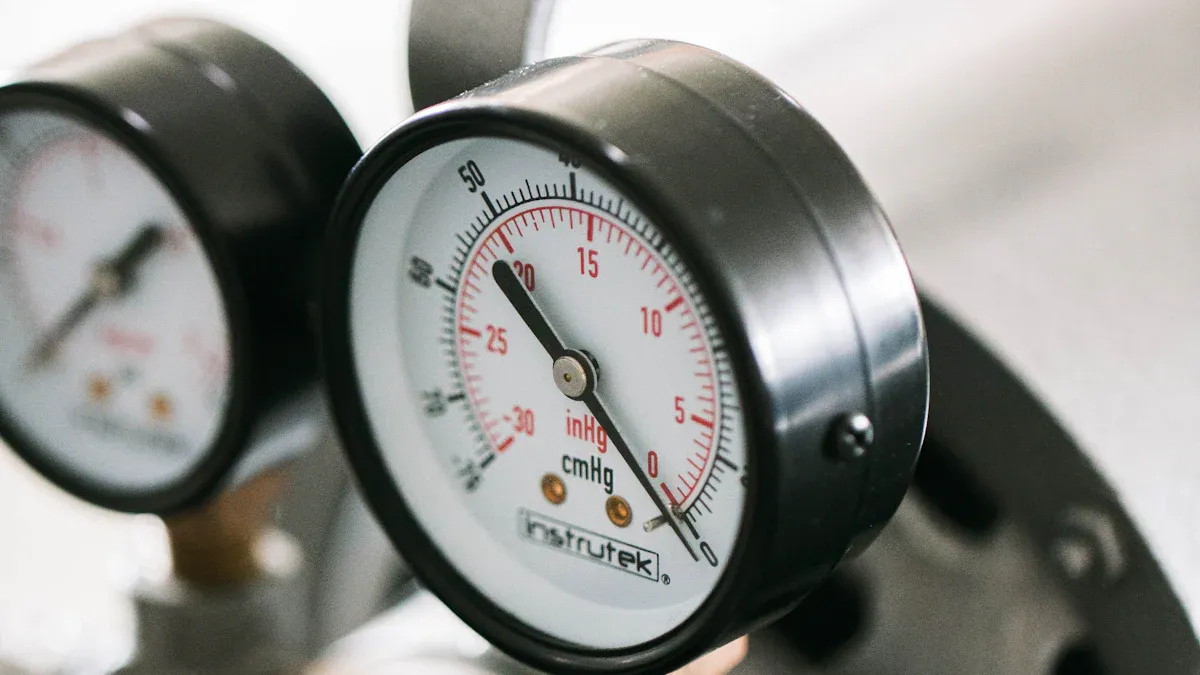
Start by looking closely at your bladder hydraulic accumulator. Check all the hydraulic connections too. Look for leaks, rust, or any damage. If you see oil near the fittings or on the shell, there might be a leak. Fix leaks right away so they do not get worse. Look at the bladder housing for dents or cracks. These can mean the accumulator has been under stress. You should also check the pressure gauge. If the pressure goes down, you might be losing pre-charge.
You need to check your accumulator on a regular schedule. When you first put it in, look at it every day for a week. If the pressure stays the same, you can check once a week. For older systems, check every three to six months. This routine helps you find problems early and keeps your accumulator working well.
Pre-Charge Pressure Check
Checking the pre-charge is very important for your bladder accumulator. Use the right tools to check and change the pre-charge pressure. Chaori Hydraulic’s gas top valves make this job safe and simple. Use a valve core tool to take out or put in the valve core. Use a torque wrench to make sure the valve core is tight. An air chuck helps you add nitrogen to the right pressure.
Here is a table that shows the tools you need for pre-charge maintenance:
| Tool Name | Description |
|---|---|
| AI-506 VALVE CORE TOOL | Removes or reinstalls the valve core in standard 3000 psi gas valves. |
| AI-527 VALVE CORE TORQUE WRENCH | Installs the valve core to the correct torque to prevent gas leakage and failure. |
| AI-CG-002 AIR CHUCK | Inflates the accumulator to the required pre-charge pressure. |
Always use dry nitrogen when you fill the accumulator. Never use air or oxygen. Using the wrong gas can be very dangerous and cause damage. The table below explains why you should not use air or oxygen:
| Evidence Type | Description |
|---|---|
| Explosion Risk | Oxygen can cause an explosion when used for pre-charging accumulators. |
| Contamination Issue | Oxygen can contaminate hydraulic fluid, leading to performance issues. |
| Preferred Gas | Dry nitrogen is recommended for charging accumulators instead of oxygen. |
Check the pre-charge pressure when you first set up the accumulator. Check it every day for the first week. If the pressure does not drop, check it once a week. For older systems, check every three to six months. This schedule helps you keep the right pre-charge and keeps your system safe.
Fluid Cleanliness
Clean hydraulic fluid is very important for your bladder accumulator. Dirt or small pieces in the fluid can hurt the bladder and seals. You should filter your hydraulic fluid to 10 microns or less. This keeps your accumulator and other parts safe.
You can use different filters to keep your fluid clean. Here is a table of common filter types:
| Filtration System Type | Description |
|---|---|
| Multi-stage filtration | Controls contamination by removing different types and sources of particles. |
| Return line filtration | Captures wear particles before they recirculate, ensuring continuous removal. |
| Pressure line filtration | Protects sensitive components from contamination, requires careful selection for reliability. |
| Kidney loop filtration | Continuously filters fluid and can achieve very low contamination levels. |
Check your filters often and change them when needed. Clean fluid helps stop problems like loss of pre-charge and keeps your accumulator working well. If you use a piston accumulator, keep its fluid clean too for the best results.
Tip: Always follow the manufacturer’s rules for maintenance and pre-charge checks. This will help your bladder accumulator work better and last longer.
Periodic Bladder Accumulator Maintenance
Bladder Replacement
You need to replace the bladder in your accumulator when you see signs of wear, loss of pre-charge, or after a certain number of years. The lifespan of a bladder depends on how you use your system. Some bladders last only 14 months if conditions are tough. High-quality bladders can last up to 8 years when you keep the system clean and follow the right maintenance interval. For example, a FKM bladder can last 8 years in sulfuric acid service.
When you need to replace the bladder, you can use a bladder kit. Chaori Hydraulic makes this process easy. Here are the steps you should follow:
- Secure the accumulator on a table. Remove the bleed plug. Use a spanner wrench to take off the lock nut and spacer from the top adapter.
- Remove the gas valve guard and jam nut from the bladder stem.
- Push the top adapter with the bladder inside the shell. Separate the anti-extrusion ring from the top adapter.
- Take out the anti-extrusion ring, top adapter, and seals from the shell.
- Pull the bladder out of the shell.
- Spray the inside of the shell with clean system fluid to lubricate it.
- Lubricate the new bladder. Install the top adapter through the bladder stem. Fasten the jam nut with a wrench.
- Fold the bladder into a compact roll. Insert it into the shell with the fluid end facing the other side.
- Insert the anti-extrusion ring at the gas end. Pull the top adapter out of the shell through the anti-extrusion ring.
- Attach the gas valve to the bladder stem. Tighten it with a wrench.
- From the fluid end, insert the fluid port and anti-extrusion ring into the shell.
- Pull the fluid port out of the shell through the anti-extrusion ring. Make sure the metal part of the ring faces outside.
- Connect the charging kit to the gas valve.
- Hold both the top adapter and fluid port straight. Open the gas cylinder valve to charge the bladder slowly.
- Stop charging when the pressure gauge shows 20 psi. Remove the charging kit.
- Install the seals on both the top adapter and fluid port in this order: metal ring, O-ring, and back-up ring.
- Install the spacer and lock nut for both the top adapter and fluid port. Tighten with a spanner wrench.
- Install the bleed plug on the fluid port.
- Install the gas valve guard at the gas end.
Tip: Always depressurize and vent all gas from the accumulator before you start any maintenance. This step protects you and your equipment from sudden energy release.
Seal and O-Ring Inspection
Seals and O-rings keep your bladder accumulator leak-free and working at optimum performance. You should inspect these parts often. Look for cracks, swelling, or wear. Replace them if you see any damage. The right maintenance interval for seals and O-rings depends on your system’s use.
| Condition | Recommended Interval |
|---|---|
| Standard Operating | Every 12 to 18 months |
| After 2 to 3 years | Replace |
| Extreme Conditions | Within a year |
If you use your system in harsh environments, check the seals more often. Always use the correct type of seal for your fluid. This step helps prevent leaks and keeps your accumulator safe. When you replace the bladder, change the seals and O-rings at the same time. This practice helps avoid future problems and loss of pre-charge.
Leak Detection
You need to check for leaks around fittings and manifold blocks during every maintenance. Leaks can lower system performance and cause damage. Use these methods to find leaks:
| Method | Description |
|---|---|
| Verify oil cleanliness | Dirty fluid can damage seals and cause leaks. |
| Check for hydraulic leaks | Look at fittings and manifold blocks for oil or wet spots. |
| Ensure correct fluid types | Use the right fluid and viscosity to prevent leaks. |
| Inspect valves and manifolds | Check valves, strainers, and manifolds for proper operation and leaks. |
| Monitor system pressure response | Slow or odd pressure changes can mean a seal is failing and a leak is present. |
| Check for unusual vibrations | Strange vibrations or noises can signal leaks or internal problems. |
| Perform pressure-holding tests | Have a technician do a hydrostatic test to find hidden leaks. |
If you find a leak, fix it right away. Tighten connections and replace damaged parts. Clean fluid helps prevent leaks in both bladder and piston accumulator systems.
Note: Never skip the step of depressurizing and venting gas before you open or service accumulators. Skipping this step can cause serious injury or equipment damage.
Bladder Accumulator Troubleshooting
Pressure Loss
Sometimes your bladder accumulator loses pressure. This can make your system work poorly. It can also cause problems with storing energy. You need to find out why this happens fast. This keeps your equipment safe and working well. The table below shows why pressure loss happens:
| Problem Description | Cause |
|---|---|
| Small hole in bladder near bladder stem | Operation with low pre-charge lets fluid force the bladder into the gas valve, causing a hole. |
| Bladder tore in the side wall during installation | Not enough lubrication before pre-charge makes the bladder stick and tear as it expands. |
| Bladder tore in the side wall during operation | Poor lubrication during use leads to sticking and tearing as the bladder expands. |
| Star burst pattern at bottom of bladder | Charging too fast makes the bladder expand quickly, which can burst or extrude it. |
You should check for these problems when you do maintenance. Make sure all connections are tight. Change any broken parts to stop more pressure loss.
Fluid Leaks
Fluid leaks can happen in both bladder and piston accumulator systems. Leaks make the pressure drop. They can also hurt other parts. You can use these steps to find and fix leaks:
- Check if the system pressure is correct.
- Look at the hydraulic fluid level.
- Check the bladder for damage or leaks.
- Look for leaks in hoses, fittings, and connections.
- Make sure the pre-charge pressure is right.
- Check the accumulator isolation valve.
- Watch the hydraulic pump while it runs.
- Check the pressure relief valve.
- Look at the system temperature.
- Check and change hydraulic filters if needed.
- Read the system instructions for the right setup.
- Test the system in different ways.
If you find a leak, fix it right away. Put in new seals and tighten any loose parts. Doing regular maintenance stops leaks and keeps your accumulators working well.
Bladder Rupture
A ruptured bladder can make your accumulator stop working. You need to see the signs early to stop damage. The table below shows common signs of a bladder rupture:
| Sign | Description |
|---|---|
| Star burst pattern | A pattern found 6-8 inches above the bottom of the bladder, showing a rupture. |
| Poppet cuts | Cuts at the bottom or side of the bladder from the poppet valve. |
| Fluid inside bladder | Fluid in the bladder means there is a hole, tear, or cut. |
If you see these signs, change the bladder right away. This helps keep your system safe and working well. Always follow the right steps when you take care of your bladder accumulator.
Tip: Check your accumulator often and fix problems fast. This helps you avoid long breaks and keeps your accumulators working their best.
Best Practices for Bladder Accumulator Maintenance
Safety Procedures
You need to follow safety steps every time you work with bladder accumulators. Always let out all the pressure before you start any maintenance. Only use dry nitrogen for pre-charging. Do not use air or oxygen. These rules keep you and your equipment safe.
Here are some important tips for storing bladders:
- Put bladders in sealed black bags that block UV light until you use them.
- Keep bladders in their original boxes to help them last longer.
- Close the tops of the boxes to stop ozone from getting in.
- Store bladders in a dark place away from sunlight and things that make ozone. Keep the room cooler than 80°F.
- Move your bladder stock around often.
- For long storage, use a clean room between 60°F and 72°F. Fill bladders with a little dry nitrogen and keep them in UV bags.
Tip: Always read the manufacturer’s rules before you do any maintenance. This helps you avoid mistakes and keeps your accumulators safe.
Documentation
You should write down every time you do maintenance. Record the date, what you did, and if you changed any parts. Use a table to keep track of your maintenance schedule:
| Date | Task Performed | Parts Replaced | Notes |
|---|---|---|---|
| 2024-06-01 | Pre-charge check | None | Pressure stable |
| 2024-06-15 | Bladder inspection | Bladder | Replaced bladder |
| 2024-07-01 | Seal and O-ring check | O-rings | No leaks found |
Good records help you see problems early and stop them. You can use this way for both bladder and piston accumulator systems.
Operator Training
You need to teach every operator who works with accumulators. Show them how to let out pressure, check pre-charge pressure, and find leaks. Teach them to use the right tools and follow safety steps. Training helps stop accidents and keeps your equipment working well.
Chaori Hydraulic can help with maintenance and training. You can ask their team for advice or help. They can also help you pick the right accumulator for your needs.
Note: Well-trained operators and good records make maintenance safer and easier.
FAQ
How often should you check the pre-charge pressure?
You should check the pre-charge pressure every week at first. If the pressure stays stable, check it every month. For older systems, check every three to six months.
What gas should you use for pre-charging a bladder accumulator?
Always use dry nitrogen for pre-charging. Never use air or oxygen. Nitrogen keeps your system safe and prevents dangerous reactions.
How do you know when to replace the bladder?
Look for signs like pressure loss, fluid leaks, or a drop in system performance. If you see these, replace the bladder right away.
Can you repair a damaged bladder, or must you replace it?
You must replace a damaged bladder. Repairs do not last and can cause more problems. Use a new bladder kit for best results.
What is the best way to store spare bladders?
Store bladders in sealed, UV-blocking bags. Keep them in a cool, dark place. Avoid sunlight and ozone. Rotate your stock often for longer life.